Wednesday 18 January 2012

packaging project printed ... but does it work ???

Packaging printed, cut and ready to be folded, fingers crossed it will work ....
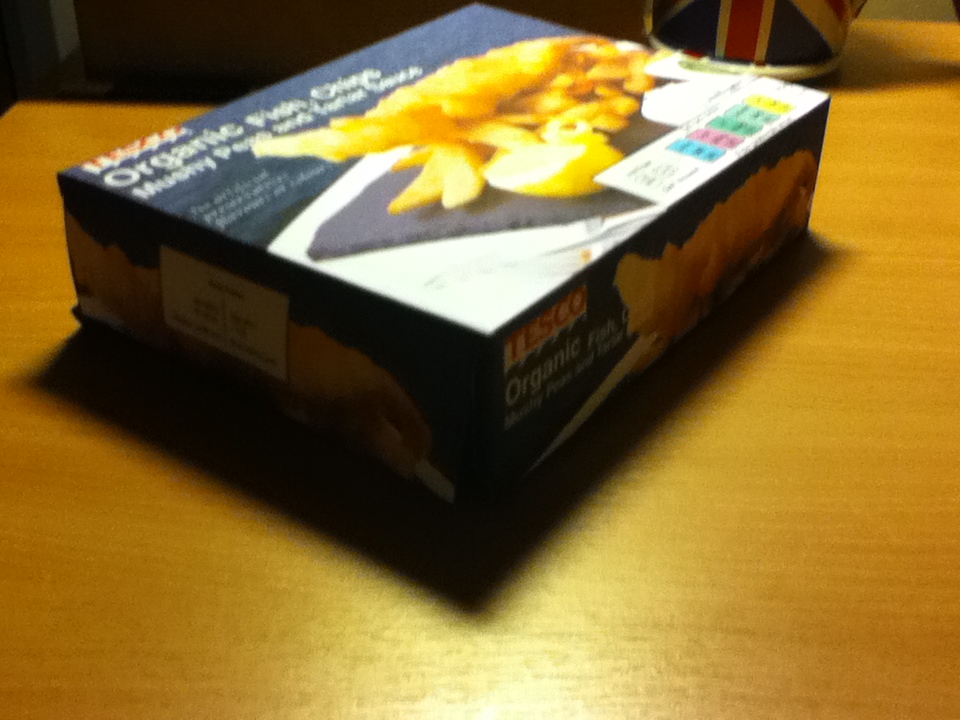
So happy it all works, never though it would work, it is held together with masking tape, just so i could try it out, it will be glued eventually.


So over all the outcome was a success, the template works and the design is really good, i think if i was to do it next time i would, take my own pictures and because i think the pictures are the only thing that makes it slide slightly where they are slightly pixelated but im very happy with it for my first go!

Franks Packaging project

Although this started out as a group project it had to change to a personal project as people didn't turn up to the next lesson so this is my packaging

I started of drawing the packaging, (not easy, this was the hardest part of the howl design) if this wasn't right this wouldn't fold into a proper piece of packaging
with all the guidelines it was hard to keep track with which line goes to what part, but once i had done one side i could just flip it and group it all together
once i had finished the outline i needed to find picture to make the packaging shout out to customers, i looked into 'Birds Eye' and a few other fish products and they always show the dish with a nice landscape in the back. As mines fish and chips i decided to go with a sea background
i found this picture, i chose it as it was fresh looking and it looked top range, suitable for my product
i then thought of copy right and photoshoped both picture together to make one, making the image my own work
once i had done the images for the packaging, i had to make all the small pieces that completes the packaging, i used illustrator to create this affect, using shapes and text
i created the barcode by hand by counting the lines of another and making lines on illustrator and making them different thicknesses, it turned out pretty well
once i was finished the back of the packaging looked like this, i found that all i had to do is place it in the spot on the packaging, along with the other little bit i designed with it my final before printing, most of the type is is between size 4 t0 12 with the title being as big as 26, i found this packaging a challenge, i think that's why i enjoyed it and the hours put in was between 8 -9 hours over 2 days. im glad its finished though, i feel like i have achieved something, where others left it, i finished !!!!

Thursday 12 January 2012

final Idea


After experimenting with this quote "be dirty" i have really fell in love with the artwork of , David Carson. Mainly one picture (Image show below) There is something about this image that i find so interesting, It is designed to make a purpose, with the negative space you are forced to look at the type, there is just enough to keep u looking and interested.
Without looking at the type and what it says. The black and white look, i feel like i have to look at it, i love the way you can't quite read the background yet you don't need to, because you know what it says.

Looking at David Carson's work, i have come up with my own idea within his. i really wanted to make mine over the top, to much, but still with the negative space left in. but just not so much that the negative space take over the type Once it was all laid out how i wanted and what looked best, i had to finalised the place of the the white font "BE DIRTY" Ideally i want it in a place where they have to look for it, but not to much, so i have tried out a few places where it could work and then asked peoples opinion!

Bottom Right
Top RightCentered Bottom Left

After everyones opinion, most peoples say they liked the bottom right because of the flow of the design and because its not the first thing you look at, you left guessing till you find it looking at my design, and listening to the opinions, and found that i agree with that they said
i think i also like it because some of the type in the background is left readable and and bigger than the white font, in some ways makes it stand out more, so don't have to look at the white font first to understand what its saying.
I like the way i have left it open for opinion, whether u think "be dirty" in a flirty, playful way or in a "Be Dirty" messy way


how you take the "Be Dirty" quote is up to you !

Monday 9 January 2012

be dirty - image ideas using type

i wanted to come up with some ideas that was dirty, this is what i came up with
these are also images so im not sure if im aloud to use them, but there good ideas

first ideas for final project -4

i started of thinking about what sort of fonts 'be dirty' relates to which immediately thought of dirty dancing film and the type they have used for the front cover, i found a font that imaged it and had a go, with what i could do with it


then changing the type as i felt it didn't work, to Helvetica (When i first got the quote i really wanted to write, "Be Dirty ..... use HELVETICA" but then soon found out we wasn't aloud to add anything else to the quote, i still might do my own spin off)


i found it hard to choose between the font, layout, size and the colours, i think i need to take another approach to this project

David Carson Ideas 10/1/12

i have found so far, the quote 'Be Dirty' very hard to get ideas for, everything i try isn't really working the way that i won't it to, but came across my essay notes and saw David Carson and thought i would try it out


after developing these designs, i found one that really works, i'm going to try and improve this one slightly and try and get it printed A1 for my final

Task 4 type project

Task 4 - for this project we was asked to just place type in a box (only using black and white)
i came up with a range of ideas but they all seamed boring or not interesting because of the boring type

i got the ides of having negative space around the outside, but i wanted people to look at something


i tried putting them all together but then it looked like a list which is what i wanted to avoid
i wanted to distal the type make it look fun so i tried putting diagonally
or changing the way the list was looked at making the text look a lot more bulkier
but some how i love the side angle affect so i'm trying to change it more
my final outcome
i found i was draw toward the corner, and it had to be the bottom left corner, so after playing with the type and making it all fit in perfectly. once i had finished placing i didn't want to move it, i fell in love with the layout and didn't want to change it
im happy with this outcome!